

Greetings My Sketch World Fans! As April winds down and you await May's sketches I thought I'd share a way for you to take one last go with April's card sketch before you tuck it away.
Card Design Inspiration

When I start looking at a sketch my mind wanders with all the possibilities - will I rotate it, create a scene, keep it as is, only select aspects of it, etc. And of course there will be mixed media play involved.
 |
| Here I've embossed the top half of the card with a stencil, outlined some of the clouds roughly with a gel pen, and added some glitter glue sparsely with my finger for additional texture and sparkle. |
For this card I started with the sketch as it was. You can see I have the base layer pretty much the same as it in the sketch. I created layers to my liking and added my mixed media additions (tutorial following for top layer). From here I changed it up a bit though.

I rotated the card sketch to look like the above photo because I had a vision in my head of a plane pulling banners behind going across the cloud top layer I created. So I headed to my stash of stamps in search of a plane stamp.
 |
| Wire replaced the banners here and a few sequins, along with a stamped sentiment and doodling around the edges finished off my design |
I had no luck in finding a plane stamp, but it actually worked out well. The bottom paper says "love you to the stars and back" so a spaceship works out better anyways, right? I think so. Now the placement and design doesn't hold true to the sketch, but its okay. This is the wonderful thing about sketches - they are meant to be springboards. You can use them wholly or just take parts for your design as I did. This card would never have come to exist if wasn't for Lucy's fabulous sketch. I took portions of it and then made it my own as well. I encourage you to be inspired and try the same!
Now for some more inspiration: a tutorial on how to emboss with your stencils!
Embossing with Stencils

In order to save this post from getting so lengthy, I created a collage of photos, we'll move from top left and work clockwise with the tutorial. Its fairly simple and please feel free to leave me questions in the comments or contact me on the forum.
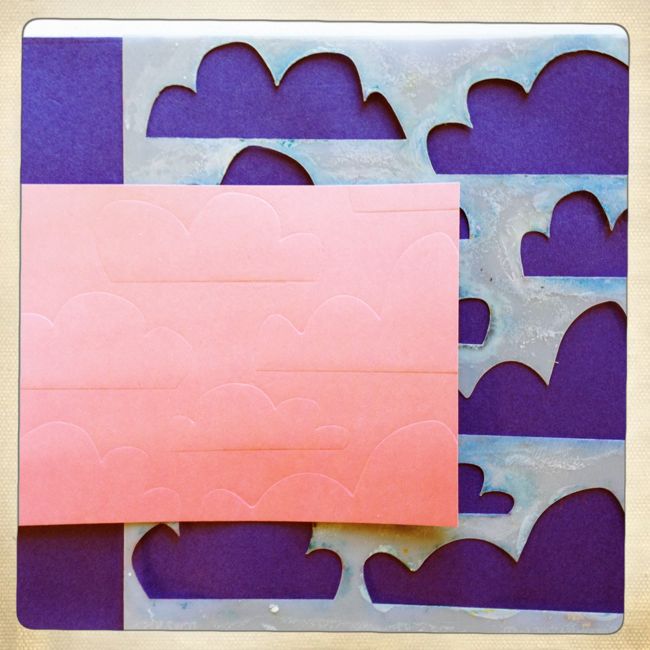
Step One: Grab your chosen 6x6 or smaller stencil (yes this will only work for small size stencils) and set it up for embossing. You will need to place your paper with the pattern you want to have embossed down. Does that make sense? Whatever side you want puffed up has to be touching the stencil in other words. If your using a Cuttlebug you will use an A, B, C plate set up for this.
Step Two: Place the C plate over the top and run your sandwich through your embossing machine.
Step Three: When you remove the sandwich from the machine, peel your stencil gently away from your paper - yes they may be slightly stuck together.
Step Four: Sit back and marvel at the beauty of an embossed stenciled piece of paper! :D
Here is what the cloud piece of paper looked like before I placed it on the card:
Same technique as above - different stencil.
I do hope you have enjoyed today's inspiration and tutorial. If you try out this technique be sure to pop on by this blog or my personal blog and let me know - I'd love to see your work and be sure to upload it in the My Sketch World gallery.
Take good care!
6 comments:
Beautiful, Scarlett! What an awesome idea to emboss with a stencil! I need to try that, for sure. TFS!
Beautiful card Scarlett.
Haven't done this yet! TFS and love our card!
Wonderful card, Scarlett! Loving the technique you shared.
Love that you embossed with a stencil - totally cool!
fabulous and thanks for the tips..
Post a Comment