After watching the video you will be able to easily make these too cute gift bags/boxes... and follow the printed directions below. Supply list: Cardstock: 9"x12" Cut/trimmer/ score piece score pad/ cutter with score piece / old pen Corner punch/ cut your own about 1" circle punch/ cut your own Glue Accents: any scraps and accents to your desire
This little but perfect size gift box.. will be amazing for Valentines Day treats for those special people in our lives. Also would be a great fabulous table treat box for dinner occasions, birthday parties.. and even a teachers gift bag.. So many different ways to use it. The front view using Lucy Chesna Design Jan. Card Sketch from My Sketch World. Sketch below.Side view.. I did the full wrap around decoration for my gift box. Added a cute tag with tied ribbon. Accented with fun punched border layered with accent paper. fun 3 D valentine stickers, a matted title and cute brads. The tag with more 3D stickers on a tag.
Here is the directions sheet to print and follow when making your project... the gift bag. Be sure to visit My Sketch World FORUM in the Tutorial by Bev section.. play along and share your project with us. We'd love to see it. Hope you have a scrappy day.. Bev MSW DT
Hi everyone, so glad you could join me today. I am sharing the Accordian Card Video Tutorial using Lucy's Decembers Card Sketch. Also it can be a mini album. Both are made the same way with only a size difference in paper.
So after watching the video here is how to make it. Using 12x12 papers - you will need either 4 pcs. cut 7x10 or 2 pcs. cut 6x12 Glue Paper hole punch Ribbon and scrap paper and accents to decorate or theme appropriately.
I used Lucy's card sketch to decorate both my card and the mini album fronts.
The card using the 4 sheets cut 7"x10".And here is the mini album. Other than a size adjustment.. it is made the same way as the card above... add photos instead of accents.The mini album uses the 2 sheets cut 6"x12".So as you can see it can be tied and sit on the table or stand opened up. The Accordian Card or Mini Album is a great gift for anyone.
Hi everyone.. I am so excited because this month Lucy Chesna Design December Layout Sketch is a double pager. I love doubles. When I am not given a double I either use 2 of her singles to make a double or make up the other half from the original. Double can be joined by many ways... either colour, accents, a flowing border, shapes and of course theme too.So on this first sample I started with page 2 ( i know that is weird but it had the 2 photos).The theme is Halloween and the pumpkin patch. I grabbed the photos, some papers and ripped the border that I wanted to flow across the page.It was looking pretty drab and needed something before I even started.So gathering some of my bigger misc background stamps, the Memento ink I was ready to add to the background... hence the background treatment.The orange piece I stamped with the circular image 4 times in each quarter section.And the full background I decided to divide into 4 quarters again but did opposite corners- opposite image.With that done the above shows the finished background look.I applied the same background treatment to the left side as you can see below.This is a closer look at the background stamping.So here is the finished left side. I added some rubons, stickers, journal stickers and a title. The spider web paper was perfect addition on this side. The rustic textured look was perfect for the Halloween page.
Here is the finished right side. So from left to right you have the background, the border and the colouring to make the flow across. On this side I added some paint behind the title which is a rubon and added some really cute stickers.Here is the double together using Lucy's amazing double page sketch.For sample #2 I thought I'd use some stamping again but use totally different background treatment to pull this double pager together.I loved this piece of paper and I had 2 of them but don't always like the same background paper on both sides... so grabbed a plain cardstock to go with it. (below a few photos)I wanted to fussy cut from the 2nd piece and use the bottom border to flow across to the 2nd page.I started by grabbing my photo and cricut cutting a Title. OMG it really looked naked? I really didn't want to cover the scalloped circle with more paper because the shape was so pretty.I put a rough paper mask on everything but the white scalloped circle so I could stamp it about 3-4 times with the snowflakes. It was the perfect touch it needed.I was happy with just adding red matting to the title and the photo and I fussy cut the 2nd piece of paper I had saved and popped up the poinsettia and added some stickles for sparkle to the berries and some of the leaves.NOW for the 2nd side on the plain cardstock. I only had one photo instead of 2 so OMG it popped into my head instantly... trees.. stamped and OMG ... the origami xmas tree too. It was perfect.So leaving enough space on the left side for the photo and the subtitle on the top left side I stamped a smaller tree, estimated the origami tree size and cricut cute another tree for a fabulous grouping. On the bottom right I stamped a small section to base the trees to. The extra sheet also had the base border so the flow from left to right with the same border. (this strip is therefore lower on my pages than in the sketch but that's my alteration to the page)I really liked the way it was coming together but still way to plain.
I added gem stones to the tree, glossy accented the title, added the sticker tree border, matted the photo, added a upper corner accent with more burgundy accent colour and added a few more smaller snowflakes.
Here is my double all put together. It has flow created through colour, matting and burgundy colour, bottom base, snowflakes, Christmas theme and photos.
And today for those of you that have learned how to make the Origami Xmas Tree below is the video to help you along. This original was taught to me by none other than Lucy. I am always so happy to pass it along and share this amazing tree design. It is amazing on layouts and also on xmas cards.
Welcome everyone. It's Bev here today to share my Video Tutorial for the "Folded Box Card" which was inspired by my friend Christine. I then took Lucy Chesna Design - the November Card sketch to inspire me and decorate the folded box card.
Lucy has many fabulous sketches every month and the DT share their interpretation of the them. Be sure to join us in the forum and use some of them at My Sketch World
This is the 1st card I made using the sketch. Love the floral tab on this one and the cute buttons. On the inside panel I used the same matching floral and added a sentiment.
This is the finished card from the video using a rounded corner square for a tab.
Here is the inside panel decorated with fun matted layers.
This is the other version of the card..(not using the sketch) but using the accent ideas from my friend Christine. (thanks Christine) Would love to see what you make using this technique... and see what accents you choose to decorate it with.
What is paper piecing? Paper Piecing is the art of cutting various shapes of paper and piecing it all back together like a puzzle. The finished paper project is called a paper piecing. The term "Paper Piecing" describes both the process and the end product. Quilters use a similar process for applique when making a quilt, we just happen to do it with paper. No sewing machine required.
Using patterns, you trace the shapes onto colored cardstock or decorative papers. You then cut and assemble the pieces in layers to create animals, cards, boxes and decorative elements.
Hi Bev here today to share my video tutorial... and some easy tips to use when paper piecing. After watching the video you are ready to grab some of the free templates and start your own. My Sketch World is home for Lucy Chesna Design Sketches. She has amazing monthly sketches to share with you. So today I am using the November Layout Sketch (sample below) to make my layout and also highlight the paper piecing accents.
So using the paper piecing as accents I put the adorable dove and the watering can of flowers on my page. Below are the detail shots of them. I choose some of the easier ones first so I wouldn't scare you off. You really need to try these cute accents.. use up some of that paper stash pieces.I added some copic marker accents to the watering can and the bakers twine tag is so cute. The heart is a brad but you could use any sticker or cut one too.
So many thanks to Scrapbook Etc.. for their amazing paper piecings. Be sure to visit their site for many more that are available for free.These are the 2 above that I used on my layout and below are some more just to peak your interest.... Would love to see you try this technique and share with us over at My Sketch World gallery and forum. We love to see your creative projects.
So until next time ... hope you have a great day and a scrappy one too.
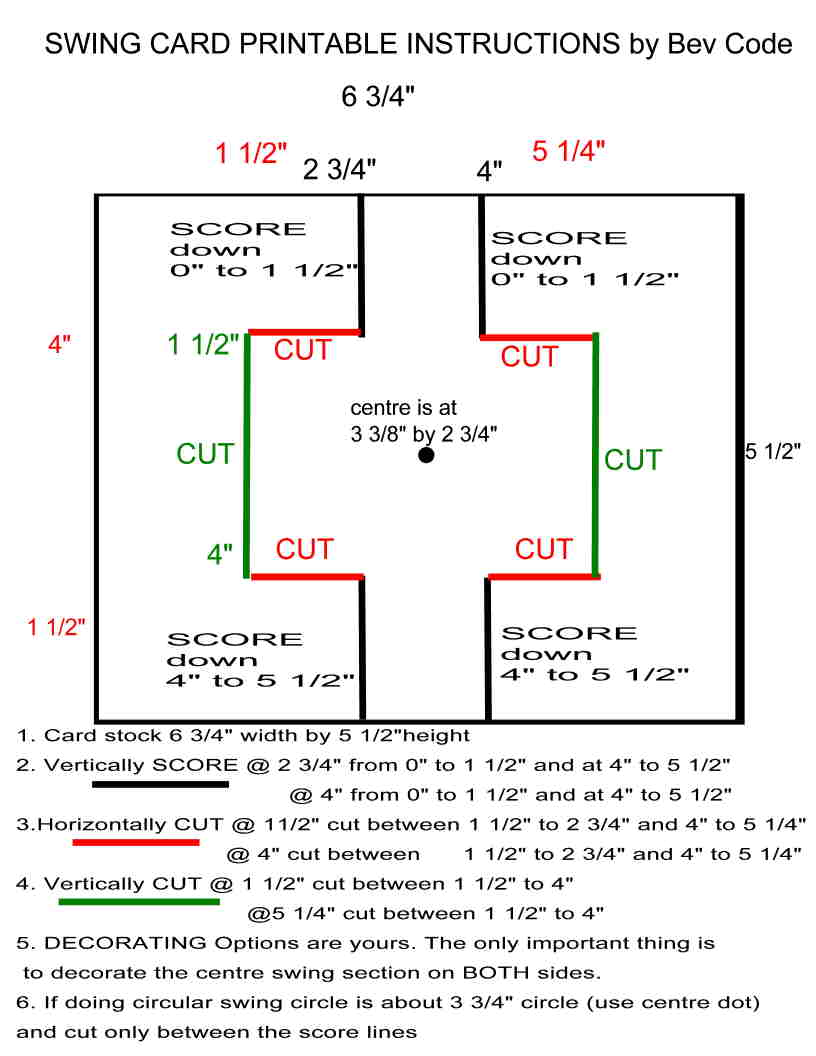
Hi ladies... today we are going to learn how to make the SWING CARD. Supplies: paper cutter with cutter and scoring blade cardstock Misc. craps for decorating the card with accents and trims Patterned paper if used can also be double sided so your inside and outside are finished.
We are also using Lucy's Card Sketch for October .. using your imagination and creativity.. we will apply the sketch to a swing card.
Here is the SWING CARD Video Tutorial.
Print the instructions to help you make the swing card after you have viewed the Video.
Here is the front of my card... I used the circular swing option so I could better follow the sketch by Lucy. Here is the back of my card... using double print paper allows for both side to look amazing. Here is a card previously made with the centre swing as a square.(not using Lucy's October Card sketch). Sure glad you could join us today.. be sure to stop by My Sketch World Forum and see what everyone is up to and share your take on the Swing Card with us.

 This little but perfect size gift box.. will be amazing for Valentines Day treats for those special people in our lives. Also would be a great fabulous table treat box for dinner occasions, birthday parties.. and even a teachers gift bag.. So many different ways to use it.
 Side view.. I did the full wrap around decoration for my gift box. Added a cute tag with tied ribbon. Accented with fun punched border layered with accent paper. fun 3 D valentine stickers, a matted title and cute brads. The tag with more 3D stickers on a tag.
 Here is the directions sheet to print and follow when making your project... the gift bag. Be sure to visit My Sketch World FORUM in the Tutorial by Bev section.. play along and share your project with us. We'd love to see it. Hope you have a scrappy day.. Bev MSW DT


 I was happy with just adding red matting to the title and the photo and I fussy cut the 2nd piece of paper I had saved and popped up the poinsettia and added some stickles for sparkle to the berries and some of the leaves.NOW for the 2nd side on the plain cardstock. I only had one photo instead of 2 so OMG it popped into my head instantly... trees.. stamped and OMG ... the origami xmas tree too. It was perfect.


