Welcome to My Sketch World

Showing posts with label Inspiration Station. Show all posts

Saturday, April 27, 2013

A Different Take on April's Card Sketch - Inspiration & Tutorial


Greetings My Sketch World Fans! As April winds down and you await May's sketches I thought I'd share a way for you to take one last go with April's card sketch before you tuck it away.

Card Design Inspiration

When I start looking at a sketch my mind wanders with all the possibilities - will I rotate it, create a scene, keep it as is, only select aspects of it, etc.  And of course there will be mixed media play involved.

Here I've embossed the top half of the card with a stencil, outlined some of the clouds roughly with a gel pen, and added some glitter glue sparsely with my finger for additional texture and sparkle.
For this card I started with the sketch as it was.  You can see I have the base layer pretty much the same as it in the sketch.  I created layers to my liking and added my mixed media additions (tutorial following for top layer).  From here I changed it up a bit though.

I rotated the card sketch to look like the above photo because I had a vision in my head of a plane pulling banners behind going across the cloud top layer I created.  So I headed to my stash of stamps in search of a plane stamp.

Wire replaced the banners here and a few sequins, along with a stamped sentiment and doodling around the edges finished off my design
I had no luck in finding a plane stamp, but it actually worked out well.  The bottom paper says "love you to the stars and back" so a spaceship works out better anyways, right? I think so.  Now the placement and design doesn't hold true to the sketch, but its okay.  This is the wonderful thing about  sketches - they are meant to be springboards.  You can use them wholly or just take parts for your design as I did.  This card would never have come to exist if wasn't for Lucy's fabulous sketch.  I took portions of it and then made it my own as well.  I encourage you to be inspired and try the same!

Now for some more inspiration: a tutorial on how to emboss with your stencils!

Embossing with Stencils


In order to save this post from getting so lengthy, I created a collage of photos,  we'll move from top left and work clockwise with the tutorial. Its fairly simple and please feel free to leave me questions in the comments or contact me on the forum.

Step One:  Grab your chosen 6x6 or smaller stencil (yes this will only work for small size stencils) and set it up for embossing.  You will need to place your paper with the pattern you want to have embossed down.  Does that make sense?  Whatever side you want puffed up has to be touching the stencil in other words. If your using a Cuttlebug you will use an A, B, C plate set up for this.

Step Two: Place the C plate over the top and run your sandwich through your embossing machine.

Step Three:  When you remove the sandwich from the machine, peel your stencil gently away from your paper - yes they may be slightly stuck together.  

Step Four: Sit back and marvel at the beauty of an embossed stenciled piece of paper! :D

Here is what the cloud piece of paper looked like before I placed it on the card:
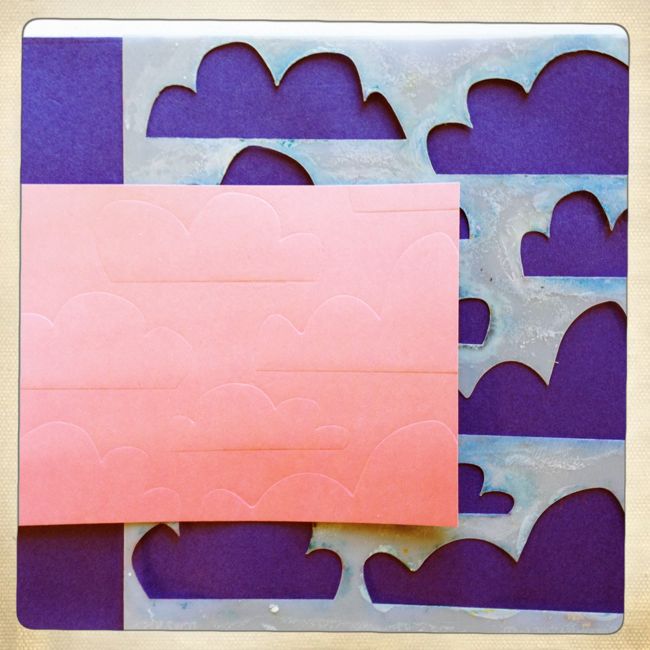

Same technique as above - different stencil.  

I do hope you have enjoyed today's inspiration and tutorial.  If you try out this technique be sure to pop on by this blog or my personal blog and let me know - I'd love to see your work and be sure to upload it in the My Sketch World gallery.

Take good care!


Monday, March 11, 2013

{Tutorial} Candi-Dot Fun

TUTORIAL
Today's tutorial is made by Vicki Roberston


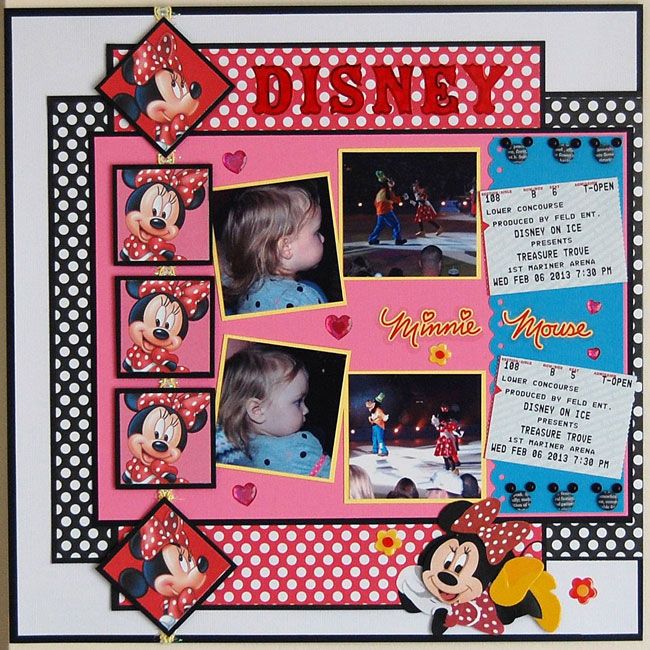
Everyone loves Mickey and Minnie Mouse! We took our grand daughter to Disney On Ice and she was completely mesmerized by the show. At 22 months of age, she didn't miss one flip, turn or jump.

The March sketch was perfect for the photos that I had. I found some cute papers and a Minnie embellishment that I wanted to use. However, I needed a few more embellishments to add to the layout. What I really wanted were some Mickey Mouse brads. I scoured the craft stores looking for some and when I couldn't find any, I decided it was time to create my own "faux" brads.

My Craftwork Cards Candi-Dots were the perfect thing for this project. These little concave paper dots come in an endless array of colors and designs. They actually look like the top of a brad. 

Supplies
Craftwork Cards Candi Dots
Craftwork Cards Candi Fix
Queen&Co Nightfall Pearls

Alternate Supplies
Black Cardstock
Buttons/Black if preferred
Punches
Twine

Image

Step 1 I chose some black newsprint dots for the head and pulled out some black pearls for the ears.

Image

Step2 Add the Candi Fix adhesive to the back of the Candi Dot. Pop Dots or Dimensionals can be used in place of the Candi Fix. 

Image

Image

Step 3 Position the Candi Dot on your layout.

Image

Step 4 Add black pearls for the ears.

Image

Step 5 If you don't have access to Candi Dots, use alternate ways to achieve similar results. Put your circle punches to work! 

Image

Step 6 Buttons are an additional item that can be used. You will need 3 buttons...1 large and 2 smaller.

Embellishments can be used in many different ways. It's not necessary to use them strictly for one purpose. Candi Dots are a versatile decoration for cards, layouts, mixed media, and altered projects. They make great flower centers and can be used in place of brads, jewels, dew drops and other non-flexible embellishments when needed. I love having them in my stash!


Tuesday, January 18, 2011

Inspiration Station for Jan

We will be discussing not just how to use the sketch but taking it to another level. One sketch can produce over 10 amazing layouts or cards by rotating, adding and deleting components of the sketch.

One of the most important piece of advice I would give anyone who uses a sketch is work it step by step. A sketch is basically a drawing of a layout showing the positions of where the title, journaling and photos go. It provides inspiration and a groundwork for the design. A sketch allows you to create a simple or complicated layout, spark your creativity, save time and encourages you to use more designs.

Here are some ways to approach the sketch. This will be the concept that I will be using on my sketches.

Jan 1st sketch

Nicole said that she kept the size and placement of the large photo and then added two additional photos underneath it.  She slid the title over to the right and moved the journaling block from the bottom of the large photo to the right side of the photo.  Finally, She added a few more embellishments to balance it all out.

Kristin kept the size and placement of the large photo and then added two additional photos underneath it and tilted them. She placed the title on top of the large photo and kept the journaling un the same area of the where its on the sketch. She added a few more embellishments to balance it all out.
Jan 17th Sketch

Kim turned the sketch to the right and placed a large photo ad the focal point. Instead using the circle as an element in the page she added a circle photo on top of it.  The title was moved over to the right and added journaling blocks from the bottom left. She added a few more embellishments to balance it all out.

Sue created a 2 pager with this sketch. She turned the sketch so the photos are on right side. She kept the size and placement of the photos and then added add her extra photos on the 2nd page. The title is over to the right and added journaling and added a few more embellishments to balance it all out.

As you can see the designers created totally different designs with the same sketch. There is endless possiblitlies to use sketches and why dont you start now.

Thank for checking this out

Wednesday, October 20, 2010

Inspiration Station

On October 15th I post a layout and card sketch. You can check them out HERE

I took the sketches and switched them around to create two new layouts sketches and 2 card sketches.

Here are some ways to approach how I approaced the sketch.


Check the placement of the pictures in the sketch
Look at the sketch and see the orientation (horizontal or vertical) of the photographs. Then, look through your stash of photographs for a combination that would go with the sketch. At that moment you can do two things---place the photos exactly how you see it or go to the next level and add more photographs that fit into the sketch. You can also rotate the sketch and make a totally new. The sketch is just the starting foundation of how you want to build it up

Analyze the sketch’s design elements
Look at a sketch and see the basic patterns and placements. You can add or delete elements in the sketch and still maintain the sketch’s balance. The recipe of the sketch is up to you because at the end, its your creation that puts a smile on your face.

Look at the embellishments and see how they are placed.
My sketches are very basic. The reason I prefer basic sketches because it allows more freedom to be creative. It’s simply helping to jump-start your creativity and lays a foundation for you.

Here are the sketches

Here is what the ladies from our Inspiration Design Team did with these sketches

Kristin used the sketches on top here is what she did with the layout and card


Sue created with the bottom half of the sketches and here it is


The ladies did an amazing job and so its your turn...get creating and enjoy the sketches

Thanks and have day

Tuesday, October 12, 2010

Inspiration Station

We will be discussing not just how to use the sketch but taking it to another level. One sketch can produce over 10 amazing layouts or cards by rotating, adding and deleting components of the sketch.

One of the most important piece of advice I would give anyone who uses a sketch is work it step by step. A sketch is basically a drawing of a layout showing the positions of where the title, journaling and photos go. It provides inspiration and a groundwork for the design. A sketch allows you to create a simple or complicated layout, spark your creativity, save time and encourages you to use more designs.

Here are some ways to approach the sketch. This will be the concept that I will be using on my sketches.

Check the placement of the pictures in the sketch
Look at the sketch and see the orientation (horizontal or vertical) of the photographs. Then, look through your stash of photographs for a combination that would go with the sketch. At that moment you can do two things---place the photos exactly how you see it or go to the next level and add more photographs that fit into the sketch. You can also rotate the sketch and make a totally new. The sketch is just the starting foundation of how you want to build it up

Analyze the sketch’s design elements
Look at a sketch and see the basic patterns and placements. You can add or delete elements in the sketch and still maintain the sketch’s balance. The recipe of the sketch is up to you because at the end, its your creation that puts a smile on your face.

Look at the embellishments and see how they are placed.
My sketches are very basic. The reason I prefer basic sketches because it allows more freedom to be creative. It’s simply helping to jump-start your creativity and lays a foundation for you.

Here the sketches we will be using for Inspiration Station - October 1st Sketches
 
Layout Sketch and Card Sketch
I rearranged the sketches and here is what I did with that

Here is what the designers did

Nicole- created her projects from the top

I turned the sketch so that the cirle is brought to the tip and shifted all the contents. Nicole did an amazing job and her son is just the cutest!
With the card, I turned it which made the scallop part on the bottom and the square on top of it. I love the way she did this card.

Kim- created her layout from the bottom

I turned the sketch like I did with the first one but I added more like photos and embellishments. Kim did an amazing job and her granddaughter is so adorable esepecially Cooper. He is a great dog!

Here is the Card that Kim did with the sketch

 
I hope you enjoy this and you will see the next Inspiration Station on the 20th. We will be taking a break for the holidays and will be with a brand new Inspiration Station in Jan 2011

*** We will still sketches but it will only be posted on the 1st of the month in November and December. We will be back to the schedule in Jan 2011

Thanks everyone

Wednesday, September 29, 2010

Inspiration Station

Hello everyone

Sorry this is late for our inspiration stations series. To much to do so little time like they say and its so true.

Today will be checking out the sketches form the 15th. You can see them HERE.

We will be discussing not just how to use the sketch but taking it to another level. One sketch can produce over 10 amazing layouts or cards by rotating, adding and deleting components of the sketch.

One of the most important piece of advice I would give anyone who uses a sketch is work it step by step. A sketch is basically a drawing of a layout showing the positions of where the title, journaling and photos go. It provides inspiration and a groundwork for the design. A sketch allows you to create a simple or complicated layout, spark your creativity, save time and encourages you to use more designs.

Here are some ways to approach the sketch. This will be the concept that I will be using on my sketches.
Check the placement of the pictures in the sketch

Look at the sketch and see the orientation (horizontal or vertical) of the photographs. Then, look through your stash of photographs for a combination that would go with the sketch. At that moment you can do two things---place the photos exactly how you see it or go to the next level and add more photographs that fit into the sketch. You can also rotate the sketch and make a totally new. The sketch is just the starting foundation of how you want to build it up

  • Analyze the sketch’s design elements
  • Look at a sketch and see the basic patterns and placements. You can add or delete elements in the sketch and still maintain the sketch’s balance. The recipe of the sketch is up to you because at the end, its your creation that puts a smile on your face.
  • Look at the embellishments and see how they are placed.
  • My sketches are very basic. The reason I prefer basic sketches because it allows more freedom to be creative. It’s simply helping to jump-start your creativity and lays a foundation for you.
Here is layout sketch from Sept 15th.
Kim to take the photo and drop the 3 photos n the bottom and create a sketch just using one photo. Here is what she did with that


Sue to take this sketch and great a 2 pager. She did an amazing job with it and here is her creation


Here is the card sketch from Sept 15th
Kim created a tag instead of a card for this sketch


Sue created this cute card by rotating it

So you can see that you can the sketch and take to a level that you will be able to create your own masterpiece. Just take the time to sit and look at the sketches in a different angle. You will be amazed by the results.

Friday, September 10, 2010

Inspiration Station

Hello everyone

This is first series on how to use the sketches. I know many have been using them since the first sketches you saw from Becky Higgins but I want to share there is more to learn from it.

We will be discussing not just how to use the sketch but taking it to another level. One sketch can produce over 10 amazing layouts or cards by rotating, adding and deleting components of the sketch.

One of the most important piece of advice I would give anyone who uses a sketch is work it step by step. A sketch is basically a drawing of a layout showing the positions of where the title, journaling and photos go. It provides inspiration and a groundwork for the design. A sketch allows you to create a simple or complicated layout, spark your creativity, save time and encourages you to use more designs.
Here are some ways to approach the sketch. This will be the concept that I will be using on my sketches.

Check the placement of the pictures in the sketch
  • Look at the sketch and see the orientation (horizontal or vertical) of the photographs. Then, look through your stash of photographs for a combination that would go with the sketch. At that moment you can do two things---place the photos exactly how you see it or go to the next level and add more photographs that fit into the sketch. You can also rotate the sketch and make a totally new. The sketch is just the starting foundation of how you want to build it up
Analyze the sketch’s design elements
  • Look at a sketch and see the basic patterns and placements. You can add or delete elements in the sketch and still maintain the sketch’s balance. The recipe of the sketch is up to you because at the end, its your creation that puts a smile on your face.
Look at the embellishments and see how they are placed.
  • The embellishments are open to many options. There is no limit so you can add or delete the items from the sketch. Anything can be used as an embellishment, even patterned paper!
My sketches are very basic. The reason I prefer basic sketches because it allows more freedom to be creative. It’s simply helping to jump-start your creativity and lays a foundation for you.

Now that you know what the sketches are there for and how to look at them; it’s time to get to the knitty griddy of the sketch.

Here are the Layout Sketches for September 1st.
Here is an example of a layout from one of our designers- Verionica


Let me show you how you can change this sketch in two ways

I took the sketch and rotated the sketch to the right and added some embellishements to it.
Here is an example of what our Inspiration Design Team member Nicole did with the sketch

On the second sketch , I rotated the sketch one more time then added 4 photos and took some stuff out
Here is what our Inspiration Design Team member Kristin did

Here is September 1st Card Sketch
Here is an example from one of our card designers, Cheryl

I took the sketch and rotated to the right
Here is an example of what our Inspiration Design Team member Nicole did with the sketch

On the second sketch, I rotated one more time to the left
Here is what our Inspiration Design Team member Kristin did


I know after seeing this, you will start thinking of other ways of using the sketches. There are many possibilites and whatever you create will be amazing.

Happy Sketching!!

Here are some dates to remember
September 15th- New Sketches
September 20th-Inspiration Station
September 18th- 1 Hour Sketch Challenge 9pm EST- More information click HERE
September 28th- Deadline for Card Conest- Click on link HERE for more information

NOTE: These brand new sketches will be posted in PICASA WEB ALBUM HERE